Introduction
What’s a Design Pattern?
Design patterns are typical solutions to commonly occurring problems in software design. They are like pre-made blue- prints that you can customize to solve a recurring design prob- lem in your code.
Classification of patterns
-
Creational patterns provide object creation mechanisms that increase flexibility and reuse of existing code.
-
Structural patterns explain how to assemble objects and class- es into larger structures, while keeping the structures flexible and efficient.
-
Behavioral patterns take care of effective communication and the assignment of responsibilities between objects.
SOFTWARE DESIGN PRINCIPLES
Features of Good Design
Code reuse
Code reuse is one of the most common ways to reduce devel- opment costs.
The intent is pretty obvious: instead of developing something over and over from scratch, why don’t we reuse existing code in new projects?
Extensibility
Change is the only constant thing in a programmer’s life.
SOLID Principles
Single Responsibility Principle
Try to make every class responsible for a single part of the functionality provided by the software, and make that respon- sibility entirely encapsulated by (you can also say hidden with- in) the class.
The main goal of this principle is reducing complexity.
There’s more: if a class does too many things, you have to change it every time one of these things changes. While doing that, you’re risking breaking other parts of the class which you didn’t even intend to change.
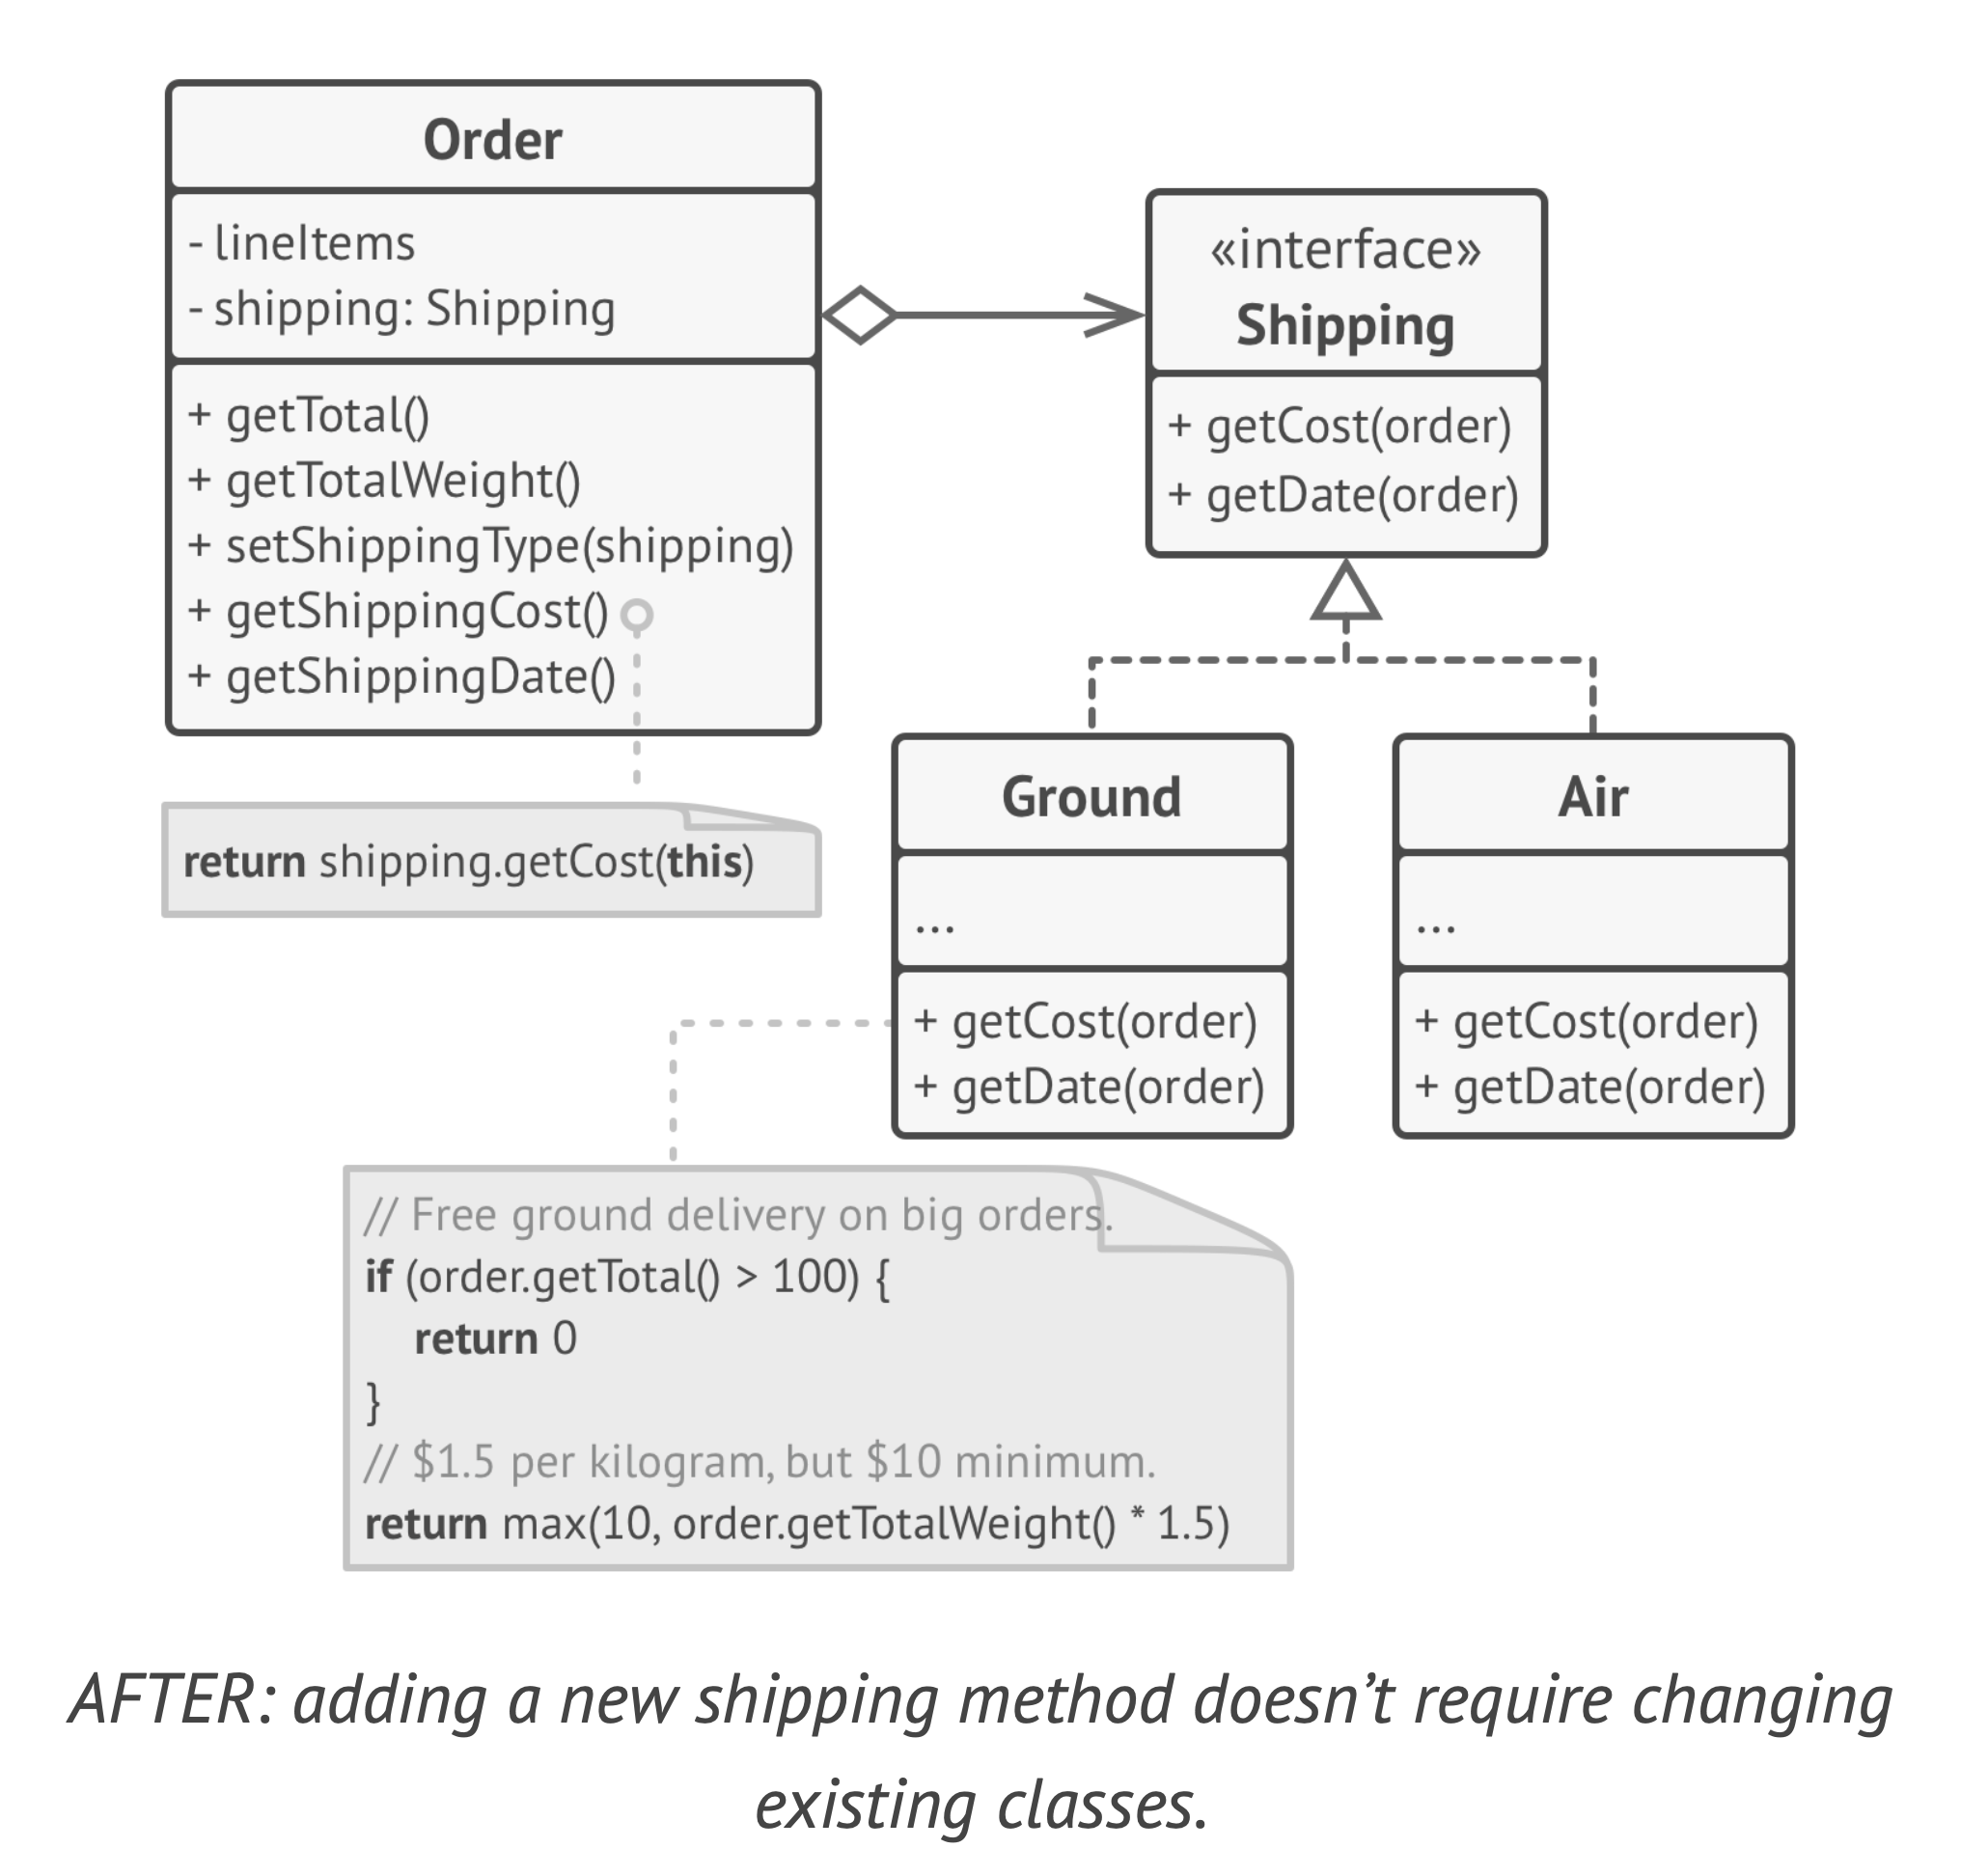
Open/Closed Principle
Classes should be open for entension but close for modification.
A class is open if you can extend it, produce a subclass and do whatever you want with it—add new methods or fields, override base behavior,
the class is closed (you can also say complete) if it’s 100% ready to be used by other classes—its interface is clearly defined and won’t be changed in the future.
Instead of changing the code of the class directly, you can create a subclass and override parts of the original class you want to behave differently.
You’ll achieve your goal but also won’t break any existing clients of the original class.
Liskov Substitution Principle
When extending a class, remember that you should be able to pass objects of the subclass in place of objects of the parent class without breaking the client code.
This means that the subclass should remain compatible with the behavior of the superclass. When overriding a method, extend the base behavior rather than replacing it with some- thing else entirely.
Parameter types in a method of a subclass should match or be more abstract than parameter types in the method of the super- class.
The return type in a method of a subclass should match or be a subtype of the return type in the method of the superclass.
A method in a subclass shouldn’t throw types of exceptions which the base method isn’t expected to throw.
A subclass shouldn’t strengthen pre-conditions.
A subclass shouldn’t weaken post-conditions.
Invariants of a superclass must be preserved.
A subclass shouldn’t change values of private fields of the superclass.
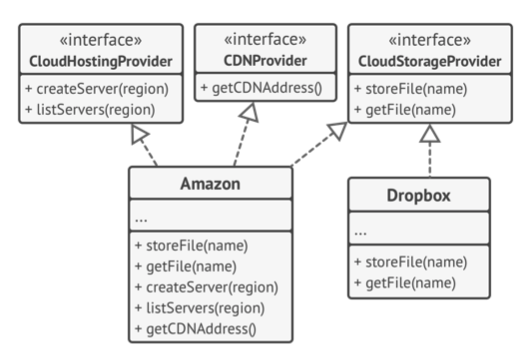
Interface Segregation Principle
Clients shouldn’t be forced to depend on methods they do not use.
Try to make your interfaces narrow enough that client classes don’t have to implement behaviors they don’t need.
According to the interface segregation principle, you should break down “fat” interfaces into more granular and specific ones. Clients should implement only those methods that they really need.
Otherwise, a change to a “fat” interface would break even clients that don’t use the changed methods.
The better approach is to break down the interface into parts.
Classes that are able to implement the original interface can now just implement several refined interfaces.
Other classes can implement only those interfaces which have methods that make sense for them.
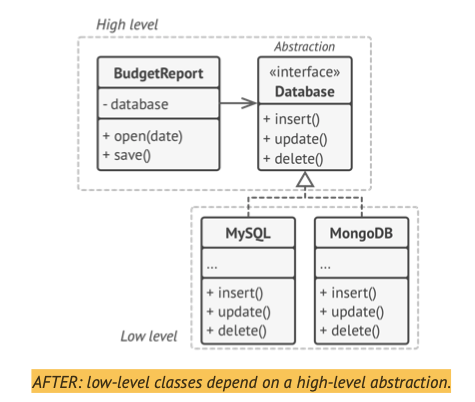
Dependency Inversion Principle
High-level classes shouldn’t depend on low-level class- es. Both should depend on abstractions. Abstractions shouldn’t depend on details. Details should depend on abstractions.
Usually when designing software, you can make a distinction between two levels of classes.
-
Low-level classes implement basic operations such as working with a disk, transferring data over a network, connecting to a database, etc.
-
High-level classes contain complex business logic that directs low-level classes to do something.
Creation Design Pattern
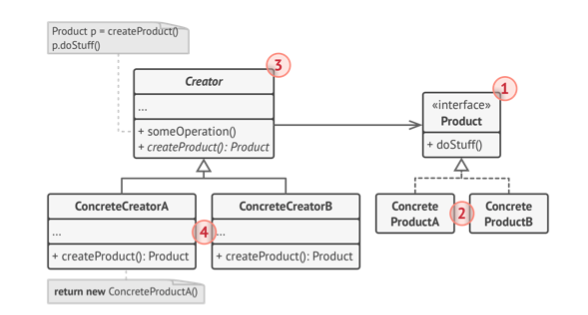
Factory Method
Factory Method is a creational design pattern that provides an interface for creating objects in a superclass, but allows subclasses to alter the type of objects that will be created.
the objects are still created via the new operator, but it’s being called from within the factory method.

//Factory
abstract class Dialog{
    abstract public Button createButton();

    void render(){
        Button okButton = createButton();
        okButton.onClick();
        okButton.render();
    }

}

//Concrete Factory
class WindowsDialog extends Dialog{
    @Override
    public Button createButton() {
        return new WindowsButton();
    }
}

//Concrete Factory
class WebDialog extends Dialog{
    @Override
    public Button createButton() {
        return new HTMLButton();
    }
}

//Product
interface Button{
    void render();
    void onClick();
}

//Concrete Product
class WindowsButton implements Button{
    @Override
    public void render(){
        //do something.
    }

    @Override
    public void onClick() {
        //do something.
    }
}

//Concrete Product
class HTMLButton implements Button{
    @Override
    public void render(){
        //do something.
    }

    @Override
    public void onClick() {
        //do something.
    }
}


public class App {
    Dialog dialog;

    //return different types of Factory. But they all have the same method.
    public App(String OS){
        if("Windows".equals(OS)){
            dialog = new WindowsDialog();
        }else{
            dialog = new WebDialog();
        }
    }

    public static void main(String[] args) {
        App app = new App("HTML");
        app.dialog.render();
    }
}
Use the Factory Method when you don’t know beforehand the exact types and dependencies of the objects your code should work with.
The Factory Method separates product construction code from the code that actually uses the product. Therefore it’s easier to extend the product construction code independently from the rest of the code.
to add a new product type to the app, you’ll only need to create a new creator subclass and override the factory method in it.
Use the Factory Method when you want to save system resources by reusing existing objects instead of rebuilding them each time.
You avoid tight coupling between the creator and the concrete products.
Single Responsibility Principle. You can move the product creation code into one place in the program, making the code eas- ier to support.
Open/Closed Principle. You can introduce new types of products into the program without breaking existing client code.
Code may be more complicated.
Abstract Factory
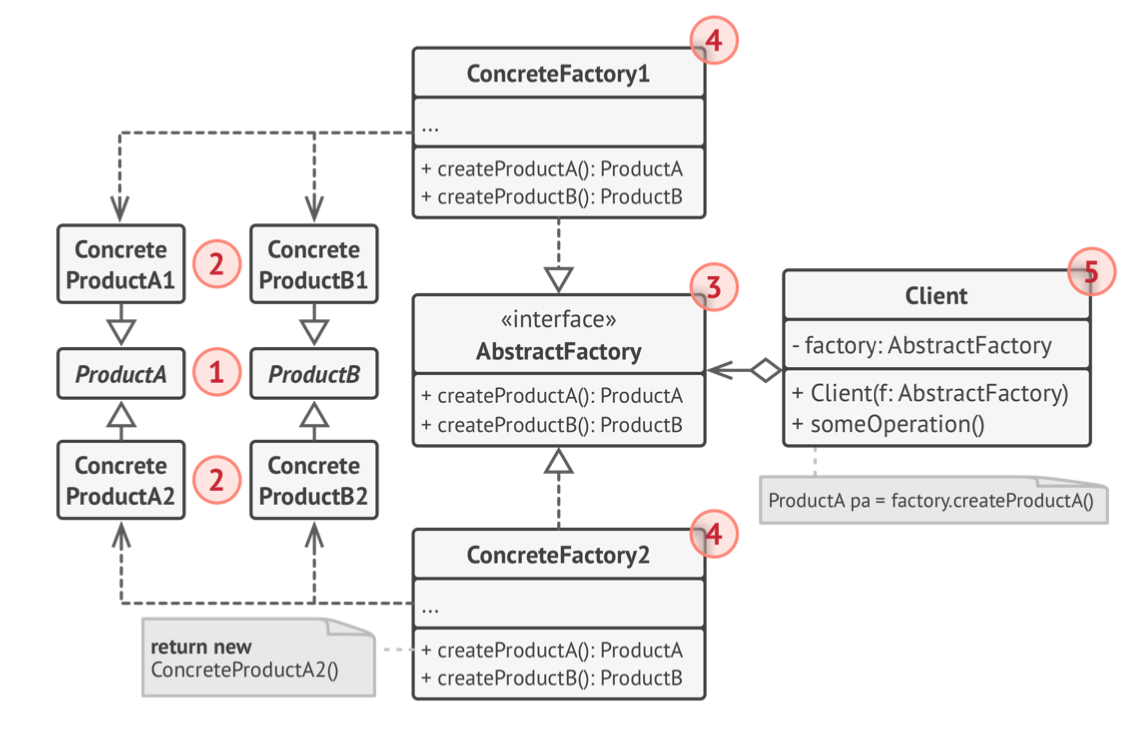
Abstract Factory is a creational design pattern that lets you produce families of related objects without specifying their concrete classes.
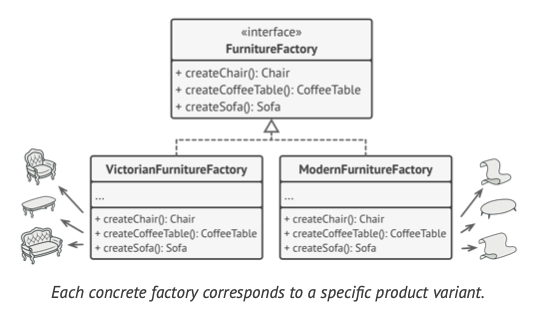
The client shouldn’t care about the concrete class of the factory it works with.
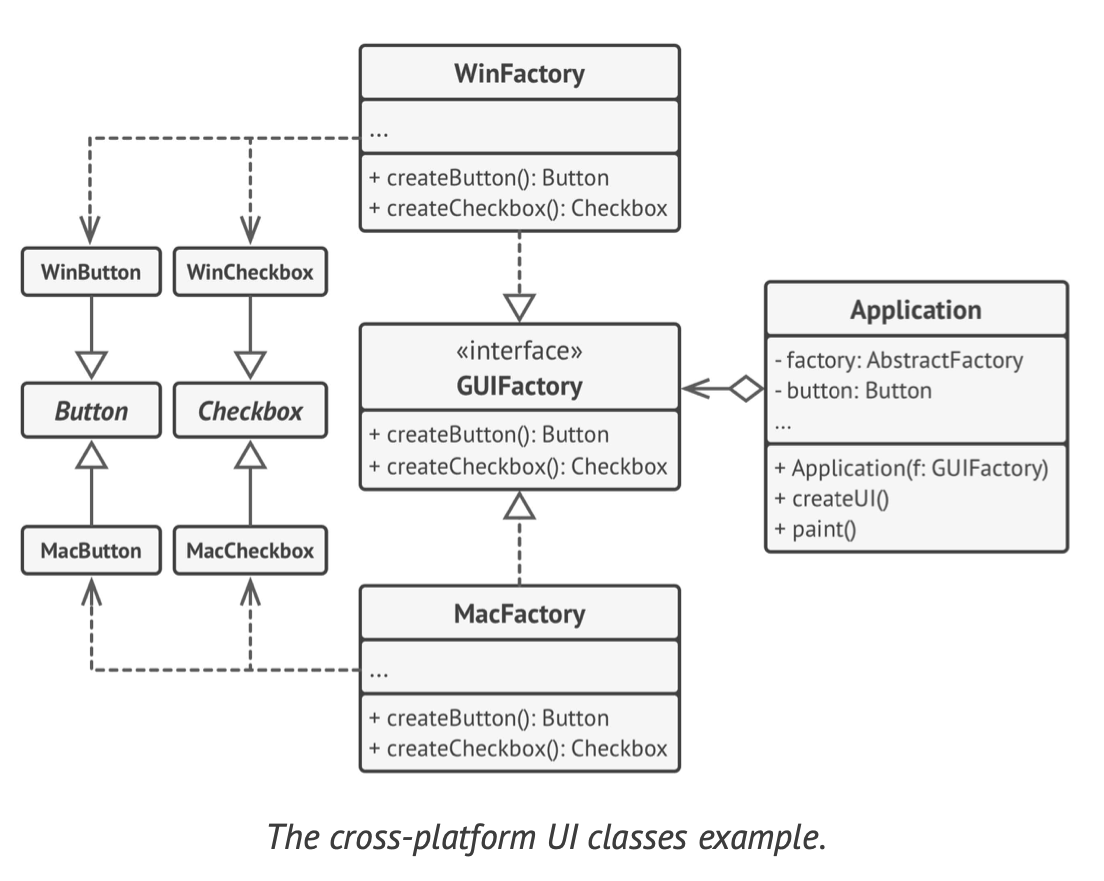
//Abstract Factory
interface GUIFactory{
    Buttons createButton();
    CheckBoxs createCheckBox();
}

//Concrete Factory
class WinFactory implements GUIFactory{
    @Override
    public Buttons createButton() {
        return new WinButton();
    }

    @Override
    public CheckBoxs createCheckBox() {
        return new WinCheckBox();
    }
}

//Concrete Factory
class MacFactory implements GUIFactory{
    @Override
    public Buttons createButton() {
        return new MacButton();
    }

    @Override
    public CheckBoxs createCheckBox() {
        return new MacCheckBox();
    }
}

//Abstract Product
interface Buttons{
    void Paint();
}

//Concrete Product
class WinButton implements Buttons{
    @Override
    public void Paint() {
        //Do Something
    }
}

//Concrete Product
class MacButton implements Buttons{
    @Override
    public void Paint() {
        //Do Something
    }
}

//Abstract Product
interface CheckBoxs{
    void Paint();
}

//Concrete Product
class WinCheckBox implements CheckBoxs{
    @Override
    public void Paint() {
        //Do Something
    }
}

//Concrete Product
class MacCheckBox implements CheckBoxs{
    @Override
    public void Paint() {
        //Do Something
    }
}

//Client
class AppFactory{
    Buttons buttons;
    CheckBoxs checkBoxs;
    GUIFactory guiFactory;

    public AppFactory(GUIFactory guiFactory){
        this.guiFactory = guiFactory;
    }

    public void createUI(){
        this.buttons = guiFactory.createButton();
        this.checkBoxs = guiFactory.createCheckBox();
    }

    public void paint(){
        this.buttons.Paint();
        this.checkBoxs.Paint();
    }
}

public class AbstractFactory {
    public static void main(String[] args) {
        String OS = "Mac";
        GUIFactory guiFactory;
        if("mac".equals(OS)){
            guiFactory = new MacFactory();
        }else{
            guiFactory = new WinFactory();
        }

        AppFactory app = new AppFactory(guiFactory);
        app.createUI();
        app.paint();


    }
}
Use the Abstract Factory when your code needs to work with various families of related products
Builder
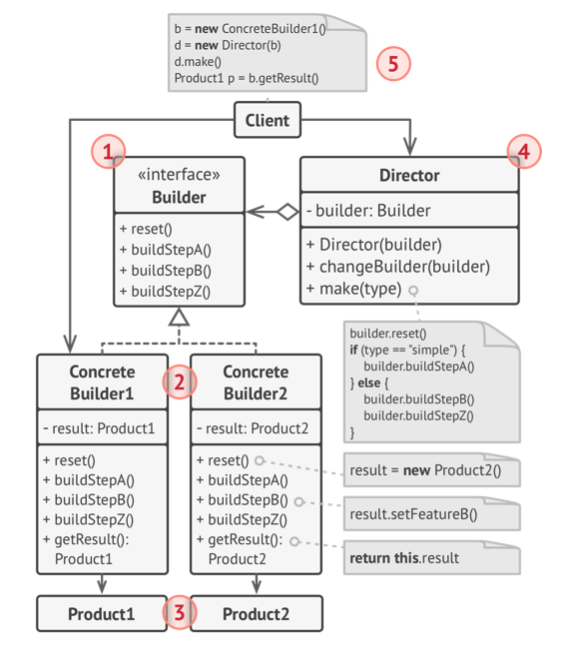
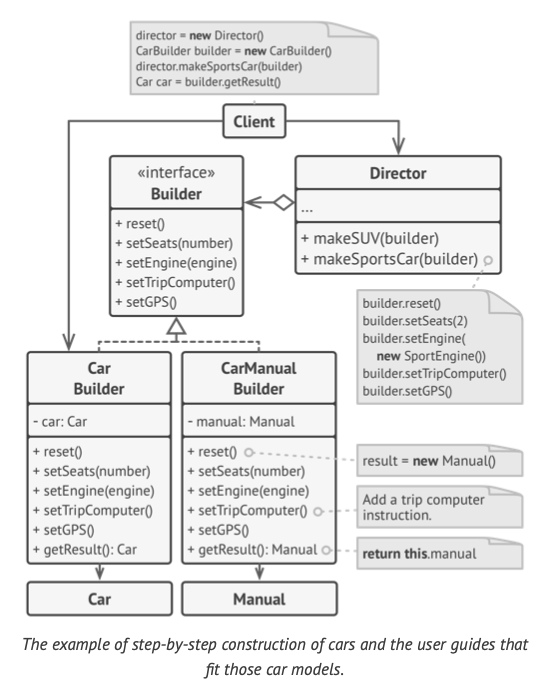
Builder is a creational design pattern that lets you construct complex objects step by step. The pattern allows you to produce different types and representations of an object using the same construction code.
The Builder pattern lets you construct complex objects step by step. The Builder doesn’t allow other objects to access the product while it’s being built.
Some of the construction steps might require different implementation when you need to build various representations of the product.
For example, walls of a cabin may be built of wood, but the castle walls must be built with stone.
create several different builder classes that implement the same set of building steps, but in a different manner.
Having a director class in your program isn’t strictly necessary.
You can always call the building steps in a specific order directly from the client code.
However, the director class might be a good place to put various construction routines so you can reuse them across your program.
-
The Builder interface declares product construction steps that are common to all types of builders.
-
Concrete Builders provide different implementations of the construction steps. Concrete builders may produce products that don’t follow the common interface.
-
Products are resulting objects. Products constructed by differ- ent builders don’t have to belong to the same class hierarchy or interface.
-
The Director class defines the order in which to call construc- tion steps, so you can create and reuse specific configurations of products.
-
The Client must associate one of the builder objects with the director. Usually, it’s done just once, via parameters of the director’s constructor. Then the director uses that builder object for all further construction. However, there’s an alternative approach for when the client passes the builder object to the production method of the director. In this case, you can use a different builder each time you produce something with the director.
Example
class Car {
}

class Manual {
}

interface Builder {
    void reset();

    void setSeats();

    void setEngine();

    void setGPS();
}

class CarBuilder implements Builder {
    private Car car;

    @Override
    public void reset() {
        this.reset();
    }

    @Override
    public void setSeats() {
    }

    @Override
    public void setEngine() {
    }

    @Override
    public void setGPS() {
    }

    Car getProduct() {
        Car res = this.car;
        this.reset();
        return car;
    }
}

class CarManualBuilder implements Builder {
    private Manual manual;

    @Override
    public void reset() {
        this.reset();
    }

    @Override
    public void setSeats() {
    }

    @Override
    public void setEngine() {
    }

    @Override
    public void setGPS() {
    }

    Manual getProduct() {
        Manual res = this.manual;
        this.reset();
        return res;
    }
}
//isn't necessary, but can be reused.

class Director {
    private Builder builder;

    void setBuilder(Builder builder) {
        this.builder = builder;
    }

    void constructSportCar(Builder builder) {
        builder.reset();
        builder.setSeats(2);
        builder.setEngine(new SportEngine());
        builder.setTripComputer(true);
        builder.setGPS(true);
    }

    void constructSUV(Builder builder) {
        builder.reset();
        builder.setSeats(4);
        builder.setEngine(new SUVEngine());
        builder.setTripComputer(true);
        builder.setGPS(true);
    }

    public static void main(String[] args) {
        Director director = new Director();

        CarBuilder carBuilder = new CarBuilder();
        director.constructSportCar(carBuilder);
        Car car = carBuilder.getProduct();

        CarManualBuilder carManualBuilder = new CarManualBuilder();
        director.constructSportCar(carManualBuilder);
        Manual carManual = carManualBuilder.getProduct();
    }
}
Applicability
- Use the Builder pattern to get rid of a “telescopic constructor”.
//too many arguments.
Pizza(int size, boolean cheese, boolean pepperoni) { ... }
- Use the Builder pattern when you want your code to be able to create different representations of some product (for example, stone and wooden houses).
Don’t forget about implementing a method for fetching the result of the construction.
The reason why this method can’t be declared inside the builder interface is that various builders may construct products that don’t have a common interface.
Therefore, you don’t know what would be the return type for such a method.
However, if you’re dealing with products from a single hierarchy, the fetching method can be safely added to the base interface.
Pros & Cons
Pros:
-
You can construct objects step-by-step, defer construction steps or run steps recursively.
-
You can reuse the same construction code when building vari- ous representations of products.
-
Single Responsibility Principle. You can isolate complex con- struction code from the business logic of the product.
Cons:
- The overall complexity of the code increases since the pattern requires creating multiple new classes.
PROTOTYPE
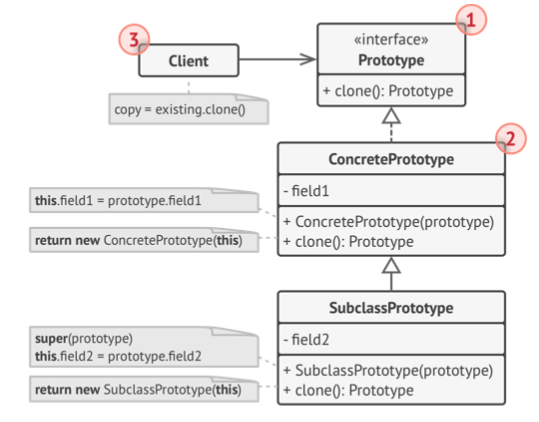
Prototype is a creational design pattern that lets you copy existing objects without making your code dependent on their classes.
Also known as Clone
-
The Prototype interface declares the cloning methods. In most cases, it’s a single clone method.
-
The Concrete Prototype class implements the cloning method. In addition to copying the original object’s data to the clone, this method may also handle some edge cases of the cloning process related to cloning linked objects, untangling recursive dependencies, etc.
-
The Client can produce a copy of any object that follows the prototype interface.
Example
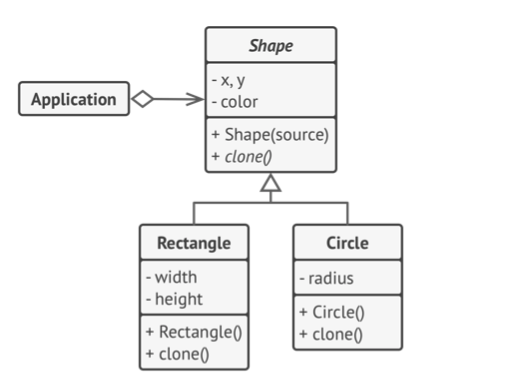
abstract class Shape {
    private int X;
    private int Y;
    private String color;

    Shape(Shape shape) {
        this.X = shape.X;
        this.Y = shape.Y;
        this.color = shape.color;
    }

    abstract Shape cloneObject();
}

class Rectangle extends Shape {
    private int Width;
    private int Height;

    Rectangle(Rectangle rectangle) {
        super(rectangle);
        this.Width = rectangle.Width;
        this.Height = rectangle.Height;
    }

    @Override
    Shape cloneObject() {
        return new Rectangle(this);
    }
}

class Circle extends Shape {
    private int radius;

    Circle(Circle circle) {
        super(circle);
        this.radius = circle.radius;
    }

    @Override
    Shape cloneObject() {
        return new Circle(this);
    }
}

class Main {
    Shape shape;

    Main() {
        //...
        Circle anotherCircle = circle.cloneObject();

    }
}
Applicability
Use the Prototype pattern when your code shouldn’t depend on the concrete classes of objects that you need to copy.
Use the pattern when you want to reduce the number of sub-classes that only differ in the way they initialize their respective objects.
Somebody could have created these subclasses to be able to create objects with a specific configuration.
Singleton
Singleton is a creational design pattern that lets you ensure that a class has only one instance, while providing a global access point to this instance.
Solution
-
Make the default constructor private, to prevent other objects from using the new operator with the Singleton class.
-
Create a static creation method that acts as a constructor. Under the hood, this method calls the private constructor to create an object and saves it in a static field. All following calls to this method return the cached object.
Example
class Database {
    private Database database;

    private Database() {
        //init the database.
    }

    public Database getInstance() {

        if (database == null) {
            new Database();
        }
        return database;
    }
}
Structural Design Pattern
Adapter
Solution
-
The adapter gets an interface, compatible with one of the existing objects.
-
Using this interface, the existing object can safely call the adapter’s methods.
-
Upon receiving a call, the adapter passes the request to the second object, but in a format and order that the second object expects.

-
The Client is a class that contains the existing business logic of the program.
-
The Client Interface describes a protocol that other classes must follow to be able to collaborate with the client code.
-
The Service is some useful class (usually 3rd-party or legacy). The client can’t use this class directly because it has an incompatible interface.
-
The Adapter is a class that’s able to work with both the client and the service: it implements the client interface, while wrapping the service object. The adapter receives calls from the client via the adapter interface and translates them into calls to the wrapped service object in a format it can understand.
-
The client code doesn’t get coupled to the concrete adapter class as long as it works with the adapter via the client interface. s
Thanks to this, you can introduce new types of adapters into the program without breaking the existing client code. This can be useful when the interface of the service class gets changed or replaced: you can just create a new adapter class without changing the client code.
Example
class RoundHole{
    Double radius;

    public RoundHole(Double radius){
        //init the round hole.
    }


    public boolean fits(RoundPeg roundPeg){
        //...
        return this.radius >= roundPeg.radius;
    }
}

class RoundPeg{
    Double radius;

    RoundPeg(Double radius){
        this.radius = radius;
    }

    Double getRadius(){
        return this.radius;
    }
}

class SquarePeg{
    Double width;

    SquarePeg(Double width){
        this.width = width;
    }
}

//adapt from RoundPeg EXTENDS
class SquarePegAdater extends RoundPeg{

    private SquarePeg squarePeg;

    SquarePegAdater(SquarePeg squarePeg) {
        super(5d);
        this.squarePeg = squarePeg;
    }

    @Override
    Double getRadius(){
        return squarePeg.width * Math.sqrt(2) / 2;
    }
}


class main{
    public static void main(String[] args) {
        RoundHole roundHole = new RoundHole(5d);
        RoundPeg roundPeg = new RoundPeg(5d);

        roundHole.fits(roundPeg); // TRUE


        SquarePeg small_sqpeg = new SquarePeg(5d);
        SquarePeg large_sqpeg = new SquarePeg(10d);

        roundHole.fits(small_sqpeg); //won't complie

        SquarePegAdater small_sqpeg_apapter = new SquarePegAdater(small_sqpeg);
        SquarePegAdater large_sqpeg_apapter = new SquarePegAdater(large_sqpeg);

        roundHole.fits(small_sqpeg_apapter); //TRUE
        roundHole.fits(large_sqpeg_apapter); //FALSE
    }
}
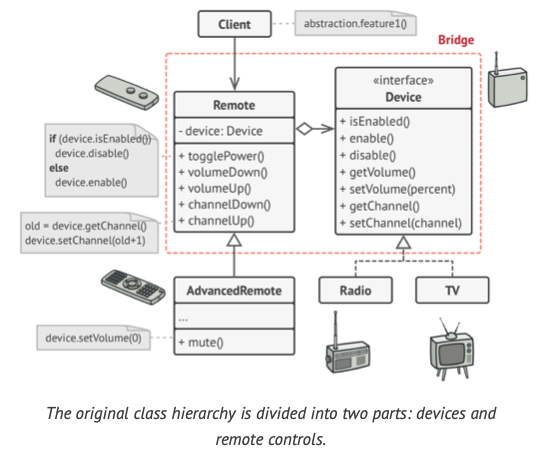
Bridge
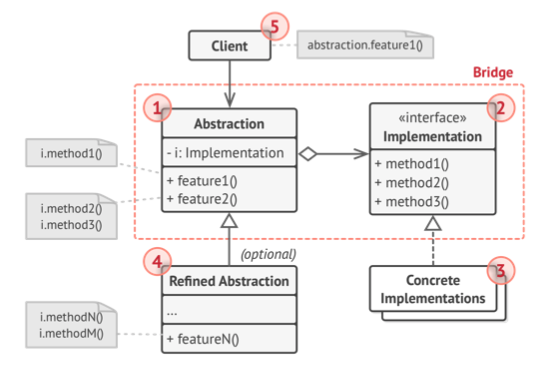
Bridge is a structural design pattern that lets you split a large class or a set of closely related classes into two separate hierarchies
abstraction and
implementation
which can be developed independently of each other.
Main idea is to seperate the abstraction and implementation.
-
The Abstraction provides high-level control logic. It relies on the implementation object to do the actual low-level work.
-
The Implementation declares the interface that’s common for all concrete implementations. An abstraction can only communicate with an implementation object via methods that are declared here. The abstraction may list the same methods as the implementation, but usually the abstraction declares some complex behaviors that rely on a wide variety of primitive operations declared by the implementation.
-
Concrete Implementations contain platform-specific code.
-
Refined Abstractions provide variants of control logic. Like their parent, they work with different implementations via the general implementation interface.
-
Usually, the Client is only interested in working with the abstraction. However, it’s the client’s job to link the abstraction object with one of the implementation objects.
Example
interface Device {
    boolean isEnabled();

    void enable();

    void disable();

    int getVolume();

    void setVolume(int percent);

    int getChannel();

    void setChannel(int channel);
}

class RemoteControl {
    Device device;

    public RemoteControl(Device device){
        this.device = device;
    }

    void togglePower(){
        if(device.isEnabled()){
            device.disable();
        }else{
            device.enable();
        }
    }
}

class AdvancedRemoteControl extends RemoteControl{

    public AdvancedRemoteControl(Device device) {
        super(device);
    }

    void mute(){
        device.setVolume(0);
    }
}

class TV implements Device{
    //...
}

class Radio implements Device{
    //...
}

class Main{
    public static void main(String[] args) {
        TV tv = new TV();
        RemoteControl TvRemoteControl = new RemoteControl(tv);

        Radio radio = new Radio();
        RemoteControl radioRemoteControl = new RemoteControl(radio);
    }
}
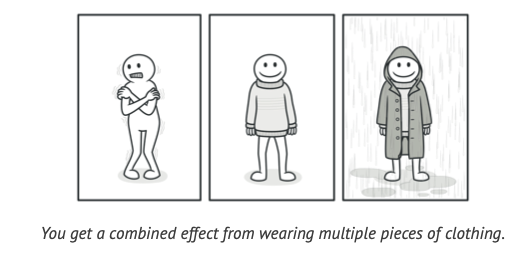
Decorator (Wrapper)
Decorator is a structural design pattern that lets you attach new behaviors to objects by placing these objects inside special wrapper objects that contain the behaviors.

-
Just before the data is written to disk, the decorators encrypt and compress it. The original class writes the encrypted and protected data to the file without knowing about the change.
-
Right after the data is read from disk, it goes through the same decorators, which decompress and decode it.
interface DataSource {
    void writeData(String data);

    String readData();
}

class FileDataSource implements DataSource{
    @Override
    public void writeData(String data) {
        //write data to database.
    }

    @Override
    public String readData() {
        //read data from database.
        return "DATA";
    }
}

class DataSourceDecorator implements DataSource{
    protected DataSource dataSource;

    DataSourceDecorator(DataSource dataSource){
        this.dataSource = dataSource;
    }


    @Override
    public void writeData(String data) {
        dataSource.writeData(data);
    }

    @Override
    public String readData() {
        return dataSource.readData();
    }
}


class EncryptionDecorator extends DataSourceDecorator{
    EncryptionDecorator(DataSource dataSource) {
        super(dataSource);
    }

    @Override
    public void writeData(String data) {
        //Encrypt data first.
        dataSource.writeData(data);
    }

    @Override
    public String readData() {
        //decrypt data first.
        return dataSource.readData();
    }
}

class CompressionDecorator extends DataSourceDecorator{
    CompressionDecorator(DataSource dataSource) {
        super(dataSource);
    }

    @Override
    public void writeData(String data) {
        //compress data first.
        dataSource.writeData(data);
    }

    @Override
    public String readData() {
        //decompress data first.
        return dataSource.readData();
    }
}

class Main{
    public static void main(String[] args) {
        DataSource dataSource = new FileDataSource();

        dataSource = new EncryptionDecorator(dataSource);

        dataSource = new CompressionDecorator(dataSource);

        dataSource.writeData("DATA");// Compression > Encryption > FileDataSource

        dataSource.readData();//  FileDataSource > Encryption > Compression
    }
}